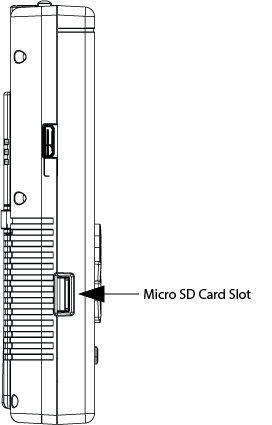
Figure 1: The micro SD card slot on the PiBoy DMG.
Physical Format
SD cards come in two sizes: the full sized SD card, which is used in many cameras, and the micro SD format which is the smaller one. The PiBoy DMG supports the Raspberry Pi Zero, 3B+ and 4B. All of these Pi models use a micro SD card, not a full sized SD card.
Storage Capacity
Micro SD cards are available in a variety of storage capacities. We recommend using no smaller than an 8GB card. An 8GB card is suitable for storing the operating system and a modest number of older games. If you plan to store a large number of games, especially from newer gaming systems, a higher capacity is recommended. The Pi 4 has been tested with up to a 128GB card successfully. The Pi 3B+ will also support up to a 128GB card like the Pi 4. We recommend up to a 32GB micro SD for use with the Pi Zero.
Performance
Micro SD cards are also rated by their performance, which is their ability to read and write data at a given speed. We recommend using a card rated “A1” or better for the best performance when playing games. The rating can be found in the product description for the card if shopping online, or on the product’s packaging if shopping in person.
Fake and Grey Market Cards
We recommend buying SD cards from reputable sellers, such as a local electronics retailer like Best Buy. Fake cards are a common problem when purchasing from places like eBay and Amazon. Fake cards often will not meet the performace specs listed on the packaging and may not even be the same capacity as listed on the package. Read the section below to learn how to test cards before using them in a PiBoy DMG.
Testing an SD Card for Performance
We recommend testing the performance of the card you plan to use in your PiBoy before flashing the operating system to it. Follow the steps below to test your sd card.
1. Download CrystalDiskMark from here.
2. Install CrystalDiskMark.
3. Insert the sd card in to the card reader of the computer being used.
4. Start CrystalDiskMark.
5. Set the test count to anywhere between 1 and 5. Set the test size to the largest usable by your sd card. Select the drive to be tested and set the test results to “IOPS”.
6. Click the “All” buttons to run all of the read and write tests.
7. Read the results. You want both of the random read tests to meet or exceed 1500 IOPS. You want the random write test to meet or exceed 500 IOPS. These numbers (1500 IOPS read and 500 IOPS write) are the bare minimum needed for the PiBoy to work properly. Below is an image of test results for a card that did not meet these minimum specs. If a test fails it is probably due to the cards capacity not being what it is listed as.
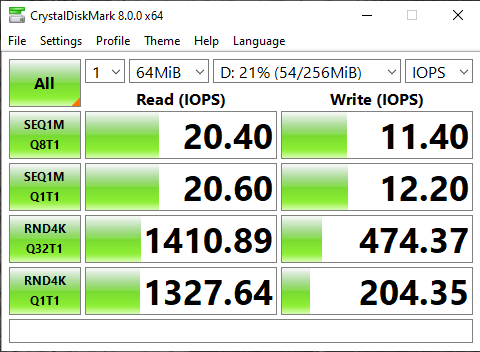
Figure 2: CrystalDiskMark results for a card not meeting our minimum specs.
Article last updated on: 21 Dec 2020
